Python tutorial#
In this tutorial we will make an actual feature contribution to Arrow following the steps specified by Quick Reference section of the guide and a more detailed Steps in making your first PR section. Navigate there whenever there is some information you may find is missing here.
The feature contribution will be added to the compute module in PyArrow. But you can also follow the steps in case you are correcting a bug or adding a binding.
This tutorial is different from the Steps in making your first PR as we will be working on a specific case. This tutorial is not meant as a step-by-step guide.
Let’s start!
Set up#
Let’s set up the Arrow repository. We presume here that Git is already installed. Otherwise please see the Set up section.
Once the Apache Arrow repository is forked we will clone it and add the link of the main repository to our upstream.
$ git clone https://github.com/<your username>/arrow.git
$ cd arrow
$ git remote add upstream https://github.com/apache/arrow
Building PyArrow#
Script for building PyArrow differs depending on the Operating System you are using. For this reason we will only refer to the instructions for the building process in this tutorial.
See also
For the introduction to the building process refer to the Building the Arrow libraries 🏋🏿♀️ section.
For the instructions on how to build PyArrow refer to the Building PyArrow section.
Create a GitHub issue for the new feature#
We will add a new feature that imitates an existing function
min_max from the arrow.compute module but makes the
interval bigger by 1 in both directions. Note that this is a
made-up function for the purpose of this guide.
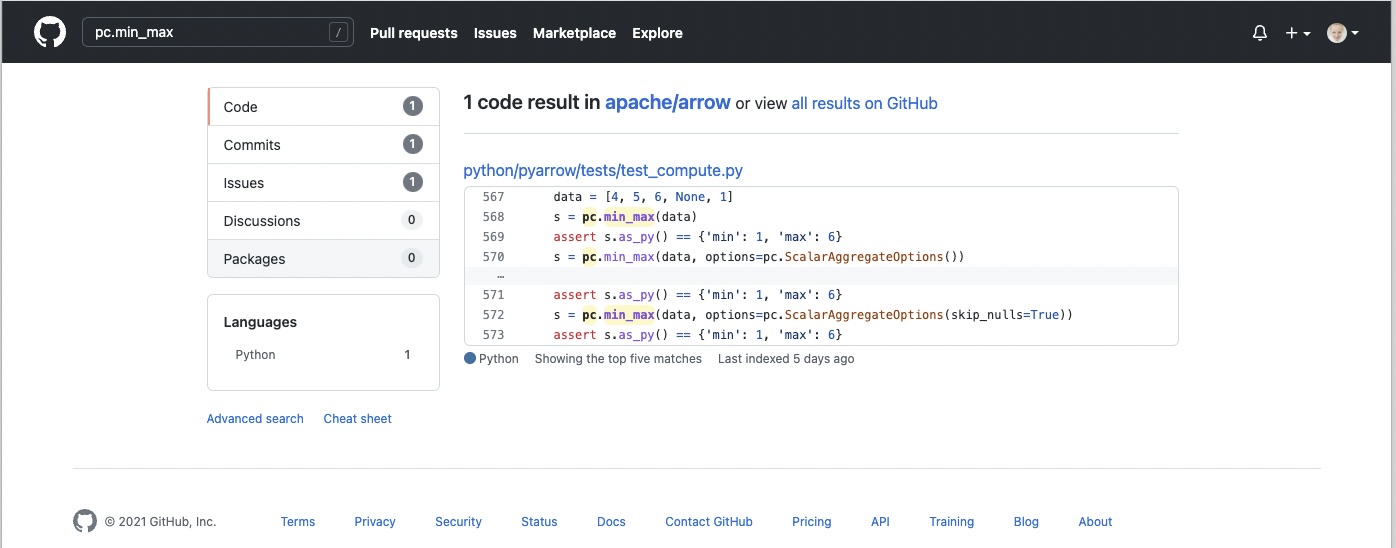
See the example of the pc.min_max in
this link.
First we need to create a GitHub issue as it doesn’t exist yet. With a GitHub account created we will navigate to the GitHub issue dashboard and click on the New issue button.
We should make sure to assign ourselves to the issue to let others
know we are working on it. You can do that with adding a comment
take to the issue created.
See also
To get more information on GitHub issues go to Finding good first issues 🔎 part of the guide.
Start the work on a new branch#
Before we start working on adding the feature we should create a new branch from the updated main branch.
$ git checkout main
$ git fetch upstream
$ git pull --ff-only upstream main
$ git checkout -b ARROW-14977
Let’s research the Arrow library to see where the pc.min_max
function is defined/connected with the C++ and get an idea
where we could implement the new feature.
We could try to search for the function reference in a GitHub Apache Arrow repository.#
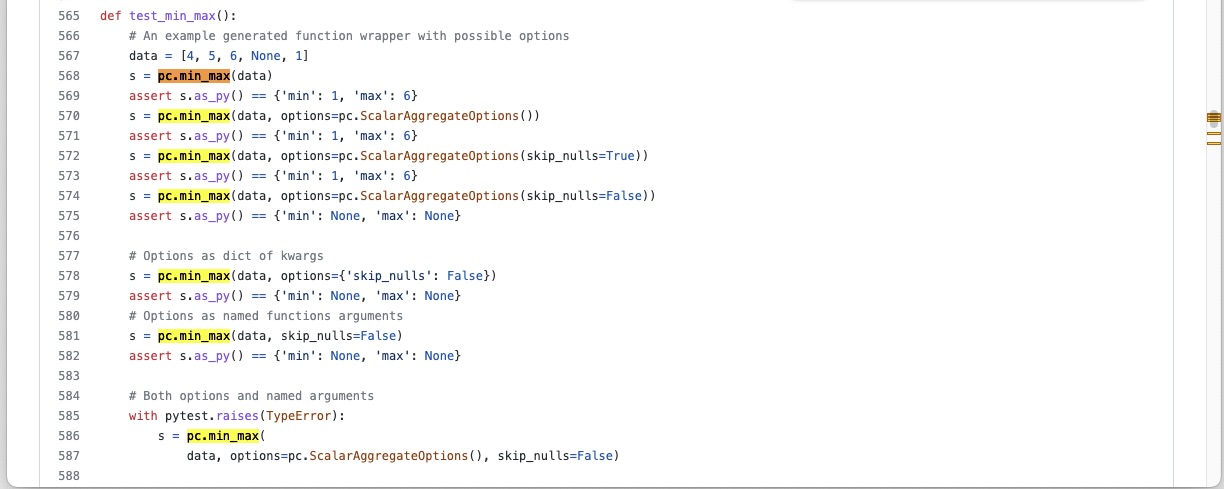
And search through the test_compute.py file in pyarrow
folder.#
From the search we can see that the function is tested in the
python/pyarrow/tests/test_compute.py file that would mean the
function is defined in the compute.py file.
After examining the compute.py file we can see that together
with _compute.pyx the functions from C++ get wrapped into Python.
We will define the new feature at the end of the compute.py file.
Lets run some code in the Python console from arrow/python
directory in order to learn more about pc.min_max.
$ cd python
$ python

Python 3.9.7 (default, Oct 22 2021, 13:24:00)
[Clang 13.0.0 (clang-1300.0.29.3)] on darwin
Type "help", "copyright", "credits" or "license" for more information.
We have entered into the Python console from the shell and we can do some research:
>>> import pyarrow.compute as pc
>>> data = [4, 5, 6, None, 1]
>>> data
[4, 5, 6, None, 1]
>>> pc.min_max(data)
<pyarrow.StructScalar: [('min', 1), ('max', 6)]>
>>> pc.min_max(data, skip_nulls=False)
<pyarrow.StructScalar: [('min', None), ('max', None)]>
We will call our new feature pc.tutorial_min_max. We want the
result from our function, that takes the same input data, to be
[('min-', 0), ('max+', 7)]. If we specify that the null value should be
included, the result should be equal to pc.min_max that is
[('min', None), ('max', None)].
Lets add the first trial code into arrow/python/pyarrow/compute.py
where we first test the call to the “min_max” function from C++:
def tutorial_min_max(values, skip_nulls=True):
    """
    Add docstrings

    Parameters
    ----------
    values : Array

    Returns
    -------
    result : TODO

    Examples
    --------
    >>> import pyarrow.compute as pc
    >>> data = [4, 5, 6, None, 1]
    >>> pc.tutorial_min_max(data)
    <pyarrow.StructScalar: [('min-', 0), ('max+', 7)]>
    """

    options = ScalarAggregateOptions(skip_nulls=skip_nulls)
    return call_function("min_max", [values], options)
To see if this works we will need to import pyarrow.compute
again and try:
>>> import pyarrow.compute as pc
>>> data = [4, 5, 6, None, 1]
>>> pc.tutorial_min_max(data)
<pyarrow.StructScalar: [('min', 1), ('max', 6)]>
It’s working. Now we must correct the limits to get the corrected
interval. To do that we have to do some research on pyarrow.StructScalar.
In test_scalars.py
under the test_struct_duplicate_fields we can see an example
of how the StructScalar is created. We could again run the
Python console and try creating one ourselves.
>>> import pyarrow as pa
>>> ty = pa.struct([
...      pa.field('min-', pa.int64()),
...      pa.field('max+', pa.int64()),
...    ])
>>> pa.scalar([('min-', 3), ('max+', 9)], type=ty)
<pyarrow.StructScalar: [('min-', 3), ('max+', 9)]>
Note
In cases where we don’t yet have good documentation, unit tests can be a good place to look for code examples.
With the new gained knowledge about StructScalar and additional
options for the pc.min_max function we can finish the work.
def tutorial_min_max(values, skip_nulls=True):

   """
   Compute the minimum-1 and maximum+1 values of a numeric array.

   This is a made-up feature for the tutorial purposes.

   Parameters
   ----------
   values : Array
   skip_nulls : bool, default True
       If True, ignore nulls in the input.

   Returns
   -------
   result : StructScalar of min-1 and max+1

   Examples
   --------
   >>> import pyarrow.compute as pc
   >>> data = [4, 5, 6, None, 1]
   >>> pc.tutorial_min_max(data)
   <pyarrow.StructScalar: [('min-', 0), ('max+', 7)]>
   """

   options = ScalarAggregateOptions(skip_nulls=skip_nulls)
   min_max = call_function("min_max", [values], options)

   if min_max[0].as_py() is not None:
     min_t = min_max[0].as_py()-1
     max_t = min_max[1].as_py()+1
   else:
     min_t = min_max[0].as_py()
     max_t = min_max[1].as_py()

   ty = pa.struct([
     pa.field('min-', pa.int64()),
     pa.field('max+', pa.int64()),
   ])
   return pa.scalar([('min-', min_t), ('max+', max_t)], type=ty)
Adding a test#
Now we should add a unit test to python/pyarrow/tests/test_compute.py
and run the pytest.
def test_tutorial_min_max():
    arr = [4, 5, 6, None, 1]
    l1 = {'min-': 0, 'max+': 7}
    l2 = {'min-': None, 'max+': None}
    assert pc.tutorial_min_max(arr).as_py() == l1
    assert pc.tutorial_min_max(arr,
                               skip_nulls=False).as_py() == l2
With the unit test added we can run the pytest from the shell. To run
a specific unit test, pass in the test name to the -k parameter.
$ cd python
$ python -m pytest pyarrow/tests/test_compute.py -k test_tutorial_min_max
======================== test session starts ==========================
platform darwin -- Python 3.9.7, pytest-6.2.5, py-1.10.0, pluggy-1.0.0
rootdir: /Users/alenkafrim/repos/arrow/python, configfile: setup.cfg
plugins: hypothesis-6.24.1, lazy-fixture-0.6.3
collected 204 items / 203 deselected / 1 selected

pyarrow/tests/test_compute.py .                                  [100%]

======================== 1 passed, 203 deselected in 0.16s ============


$ python -m pytest pyarrow/tests/test_compute.py
======================== test session starts ===========================
platform darwin -- Python 3.9.7, pytest-6.2.5, py-1.10.0, pluggy-1.0.0
rootdir: /Users/alenkafrim/repos/arrow/python, configfile: setup.cfg
plugins: hypothesis-6.24.1, lazy-fixture-0.6.3
collected 204 items

pyarrow/tests/test_compute.py ................................... [ 46%]
.................................................                 [100%]

========================= 204 passed in 0.49s ==========================
See also
For more information about testing see Testing 🧪 section.
Check styling#
At the end we also need to check the styling. In Arrow we use a utility called pre-commit to check if code is in line with PEP 8 style guide.
$ pre-commit run --show-diff-on-failure --color=always --all-files python
Done. Now lets make the Pull Request!
Creating a Pull Request#
First let’s review our changes in the shell using
git status to see which files have been changed and to
commit only the ones we are working on.
$ git status
On branch ARROW-14977
Changes not staged for commit:
  (use "git add <file>..." to update what will be committed)
  (use "git restore <file>..." to discard changes in working directory)
   modified:   python/pyarrow/compute.py
   modified:   python/pyarrow/tests/test_compute.py

no changes added to commit (use "git add" and/or "git commit -a")
And git diff to see the changes in the files
in order to spot any error we might have made.
$ git diff
diff --git a/python/pyarrow/compute.py b/python/pyarrow/compute.py
index 9dac606c3..e8fc775d8 100644
--- a/python/pyarrow/compute.py
+++ b/python/pyarrow/compute.py
@@ -774,3 +774,45 @@ def bottom_k_unstable(values, k, sort_keys=None, *, memory_pool=None):
         sort_keys = map(lambda key_name: (key_name, "ascending"), sort_keys)
     options = SelectKOptions(k, sort_keys)
     return call_function("select_k_unstable", [values], options, memory_pool)
+
+
+def tutorial_min_max(values, skip_nulls=True):
+    """
+    Compute the minimum-1 and maximum-1 values of a numeric array.
+
+    This is a made-up feature for the tutorial purposes.
+
+    Parameters
+    ----------
+    values : Array
+    skip_nulls : bool, default True
+        If True, ignore nulls in the input.
+
+    Returns
+    -------
+    result : StructScalar of min-1 and max+1
+
+    Examples
+    --------
+    >>> import pyarrow.compute as pc
+    >>> data = [4, 5, 6, None, 1]
+    >>> pc.tutorial_min_max(data)
+    <pyarrow.StructScalar: [('min-', 0), ('max+', 7)]>
+    """
+
+    options = ScalarAggregateOptions(skip_nulls=skip_nulls)
+    min_max = call_function("min_max", [values], options)
+
...
Everything looks OK. Now we can make the commit (save our changes to the branch history):
$ git commit -am "Adding a new compute feature for tutorial purposes"
[ARROW-14977 170ef85be] Adding a new compute feature for tutorial purposes
 2 files changed, 51 insertions(+)
We can use git log to check the history of commits:
$ git log
commit 170ef85beb8ee629be651e3f93bcc4a69e29cfb8 (HEAD -> ARROW-14977)
Author: Alenka Frim <frim.alenka@gmail.com>
Date:   Tue Dec 7 13:45:06 2021 +0100

    Adding a new compute feature for tutorial purposes

commit 8cebc4948ab5c5792c20a3f463e2043e01c49828 (main)
Author: Sutou Kouhei <kou@clear-code.com>
Date:   Sun Dec 5 15:19:46 2021 +0900

    ARROW-14981: [CI][Docs] Upload built documents

    We can use this in release process instead of building on release
    manager's local environment.

    Closes #11856 from kou/ci-docs-upload

    Authored-by: Sutou Kouhei <kou@clear-code.com>
    Signed-off-by: Sutou Kouhei <kou@clear-code.com>
...
If we would started the branch some time ago, we may need to rebase to upstream main to make sure there are no merge conflicts:
$ git pull upstream main --rebase
And now we can push our work to the forked Arrow repository on GitHub
called origin.
$ git push origin ARROW-14977
Enumerating objects: 13, done.
Counting objects: 100% (13/13), done.
Delta compression using up to 8 threads
Compressing objects: 100% (7/7), done.
Writing objects: 100% (7/7), 1.19 KiB | 1.19 MiB/s, done.
Total 7 (delta 6), reused 0 (delta 0), pack-reused 0
remote: Resolving deltas: 100% (6/6), completed with 6 local objects.
remote:
remote: Create a pull request for 'ARROW-14977' on GitHub by visiting:
remote:      https://github.com/AlenkaF/arrow/pull/new/ARROW-14977
remote:
To https://github.com/AlenkaF/arrow.git
 * [new branch]          ARROW-14977 -> ARROW-14977
Now we have to go to the Arrow repository on GitHub to create a Pull Request. On the GitHub Arrow page (main or forked) we will see a yellow notice bar with a note that we made recent pushes to the branch ARROW-14977. That’s great, now we can make the Pull Request by clicking on Compare & pull request.
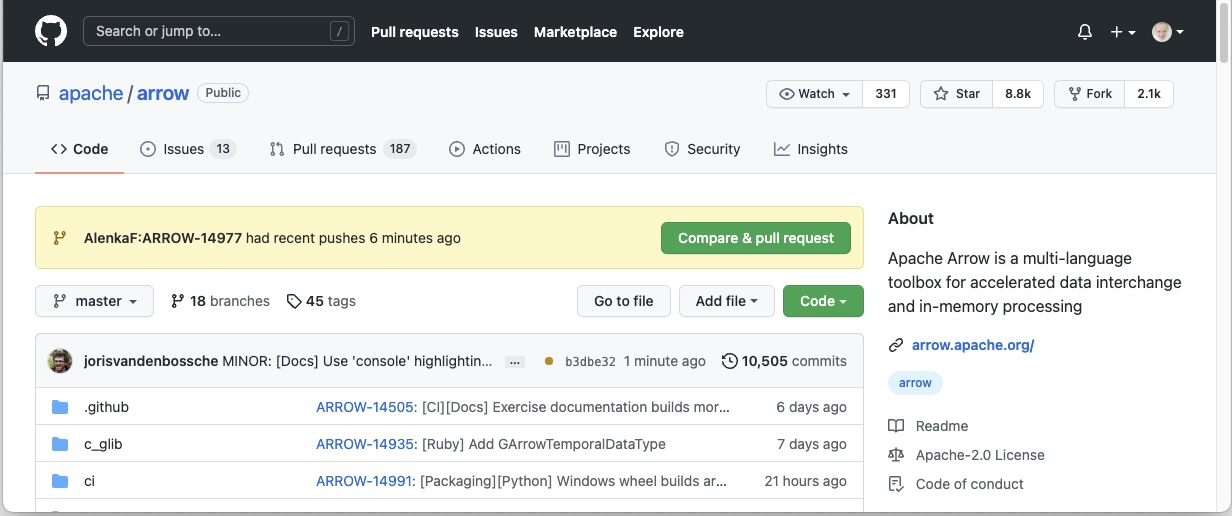
Notice bar on the Apache Arrow repository.#
First we need to change the Title to ARROW-14977: [Python] Add a “made-up” feature for the guide tutorial in order to match it with the issue. Note a punctuation mark was added!
Extra note: when this tutorial was created, we had been using the Jira issue tracker. As we are currently using GitHub issues, the title would be prefixed with GH-14977: [Python] Add a “made-up” feature for the guide tutorial.
We will also add a description to make it clear to others what we are trying to do.
Once I click Create pull request my code can be reviewed as a Pull Request in the Apache Arrow repository.
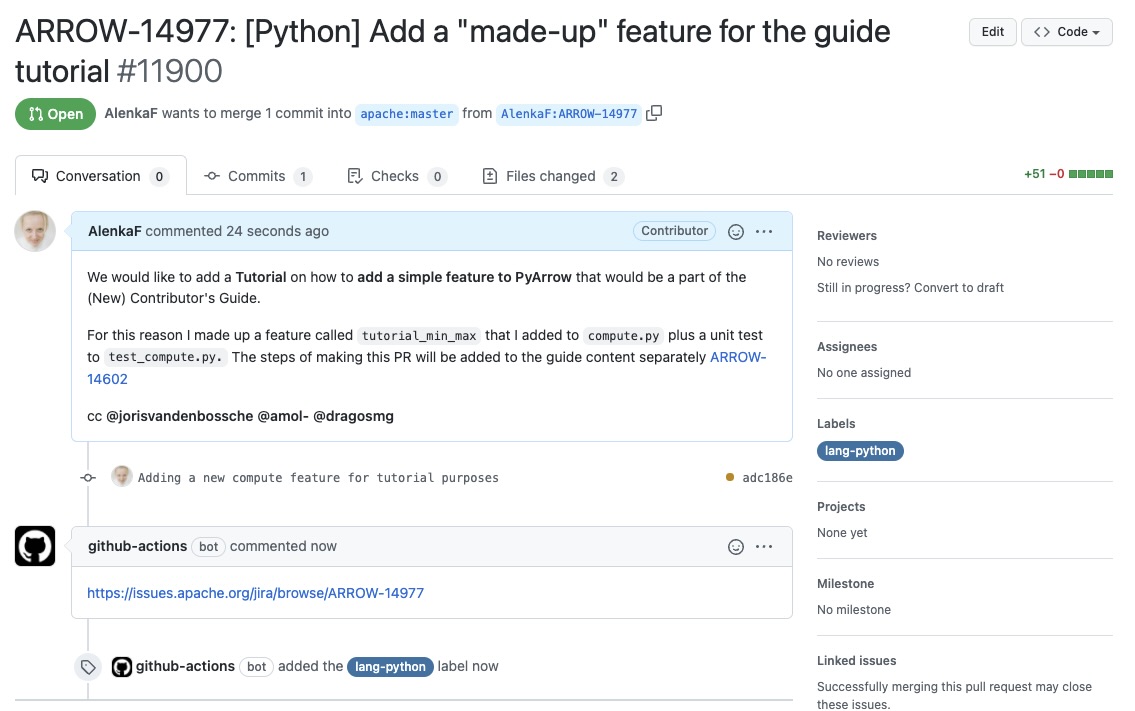
Here it is, our Pull Request!#
The Pull Request gets connected to the issue and the CI is running. After some time passes and we get a review we can correct the code, comment, resolve conversations and so on. The Pull Request we made can be viewed here.
See also
For more information about Pull Request workflow see Lifecycle of a pull request.